Linux user needs to choose a preferred software for everything. I will show how I take a screenshot and record a video to upload to my blog.
Screenshot – mate-screenshot
I use mate-screenshot. I use Linux-Mint Mate version. So it is installed by default.
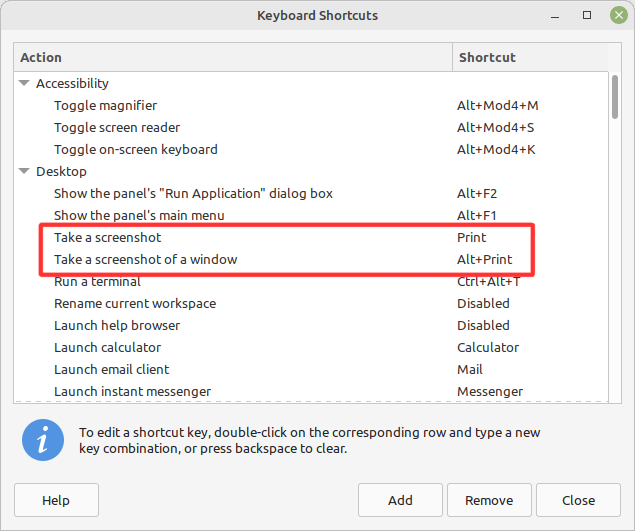
If you use Linux-Mint, you can take a screenshot by Print Screen button. Likewise, Alt + Print takes a screenshot of a window.
But I sometimes want to take a screenshot of an area. Of course, it’s possible to do it from the window but I want a shortcut for it.
We can see all the options by adding --help.
$ mate-screenshot --help
Usage:
mate-screenshot [OPTION…] Take a picture of the screen
Help Options:
-h, --help Show help options
--help-all Show all help options
--help-gtk Show GTK+ Options
Application Options:
-w, --window Grab a window instead of the entire screen
-a, --area Grab an area of the screen instead of the entire screen
-c, --clipboard Send grabbed area directly to the clipboard
-b, --include-border Include the window border with the screenshot
-B, --remove-border Remove the window border from the screenshot
-d, --delay=seconds Take screenshot after specified delay [in seconds]
-e, --border-effect=effect Effect to add to the border (shadow, border or none)
-i, --interactive Interactively set options
--version Print version information and exit
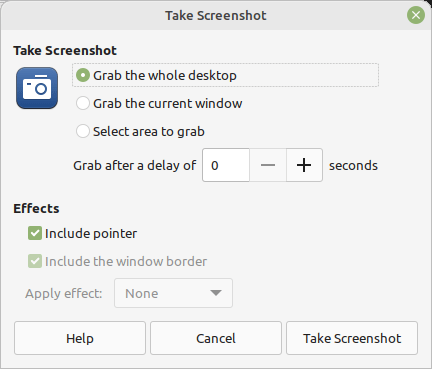
--display=DISPLAY X display to useSo we can use -a option here.
mate-screenshot -aSo, click Add button to open Custom Shortcut screen.
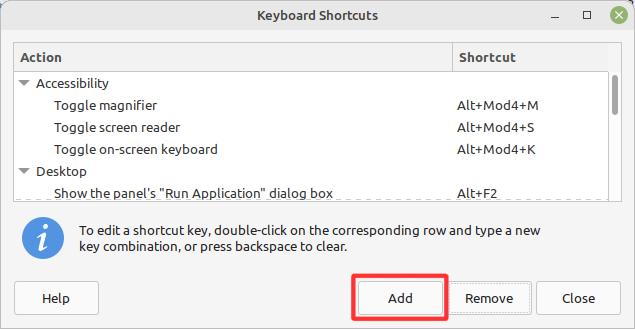
Add command mate-screenshot -a to Command: and click Apply. Don’t forget to give the arbitrary name.
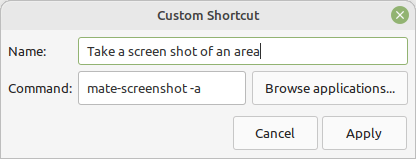
Then, you register your shortcut. Double-click Shortcut column followed by pressing your shortcut keys.

After the shortcut value changes, you can take a screenshot with the shortcut.
Video recording – Kazam
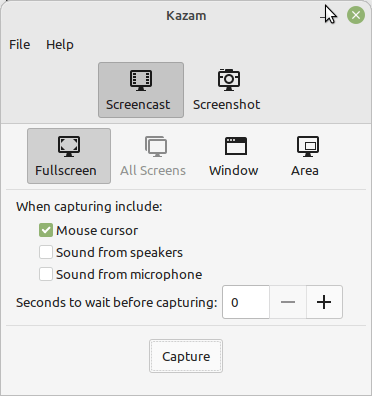
I use Kazam to record a video.
You can directly install it by the following commands.
sudo apt update
sudo apt install kazam
I normally use it to create a sample video for Flutter application. If you check my Flutter post, you can check them. So, it’s important for me to have Window option. It also has a feature to wait xx seconds before starting the recording.
If you want to finish the recording, you can do it from the icon at the right bottom.

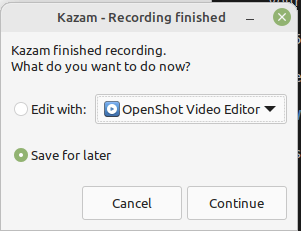
I guess you can directly edit the video if one of the tools is installed. You can select one of the following.
- OpenShot Video Editor
- Pitivi
- Avidemux
I tried to edit a video after saving the file but an error occurred in Avidemux anit was not able to edit it. I shouldn’t choose Save for later but needed to select Edit with Avidemux.
Comments